Build on Your Own Lot in Waco, TX: The Complete Guide to Building Your Dream Home
Building a custom home on your own land is an exciting way to create a living space that matches your lifestyle, preferences, and future goals. Instead of adapting to an existing property’s layout, you can plan your home around your family’s needs, preferred design, and budget.
For homeowners in Waco, TX, building Build on Your Own Lot in Waco to create a personalized home in a location they already love. However, successful construction requires careful planning, property evaluation, budgeting, and the right building team.
From checking land suitability to completing the final inspection, every stage plays an important role in the success of your project.
In this guide, we explain everything you need to know about building on your own lot in Waco, TX, including the benefits, preparation process, construction costs, permits, and common mistakes to avoid.
What Does It Mean to Build on Your Own Lot?


Building on your own lot means constructing a new home on a piece of land you already own or intend to purchase. You work with a custom home builder to plan the design, prepare the property, and manage the construction process.
This approach gives you greater flexibility than purchasing a completed home. You can choose your preferred floor plan, exterior style, kitchen layout, flooring, fixtures, and other features.
For example, you might want an open-concept living area, a spacious kitchen, additional bedrooms, a home office, or a covered outdoor patio. A custom home builder can help turn these preferences into a practical design.
However, owning land does not automatically mean it is ready for construction. Before building, you must evaluate the property’s condition, utility access, drainage, boundaries, and applicable local regulations.
Understanding these factors early can help you avoid unexpected expenses and construction delays.
Benefits of Building a Custom Home on Your Own Lot in Waco, TX
1.Build on Your Own Lot in Waco That Fits Your Lifestyle
One of the biggest advantages of building on your own lot is the ability to personalize your home.
Instead of choosing from the limited layouts of existing houses, you can work with your builder to create a floor plan that suits your daily routine.
Consider features such as:
- Open-concept kitchen, dining, and living spaces
- Spacious bedrooms and practical storage
- A dedicated home office or study area
- Energy-efficient windows and insulation
- A covered patio for outdoor relaxation
- Flexible spaces for future family needs
The final design should balance your preferences with your budget, lot dimensions, and building requirements.
2. Make the Most of Your Property


Every property has different characteristics. Some lots offer generous outdoor space, while others have established trees, sloping ground, or limited road access.
A well-planned home design considers these conditions from the beginning.
Your builder can help determine the best placement for the house, driveway, outdoor living areas, and other features. Proper planning can also help preserve usable yard space and improve privacy.
In Central Texas, drainage deserves particular attention. Heavy rainfall can expose problems on properties with poor grading or inadequate water management. Addressing these concerns before construction can help protect the home and surrounding landscape.
3. Choose Your Materials and Finishes
Building a custom home gives you more control over the materials and finishes used throughout the property.
You may select kitchen countertops, cabinetry, flooring, bathroom fixtures, lighting, exterior finishes, and roofing materials.
Your selections can influence the home’s appearance, maintenance needs, and overall construction cost.
For example, durable flooring may be suitable for busy family areas, while energy-efficient windows may help improve indoor comfort during hot Texas summers.
Discuss your priorities with your builder before construction begins. Making important selections early can reduce last-minute changes and help keep the project organized.
4. Plan for Future Needs
A custom home can be designed to support your family’s changing needs.
You might want an additional bedroom, a flexible guest room, wider doorways, extra storage, or a layout that supports comfortable single-level living.
Planning these features during the design stage may be easier than adding them later.
Think about how you expect to use your home over the next five, ten, or twenty years. This can help you make practical decisions that improve long-term functionality.
5. Build in a Location You Already Own

If you already own land in Waco or the surrounding McLennan County area, building on it may allow you to remain in a familiar location.
You may already appreciate the neighborhood, nearby schools, commute, or access to local amenities.
However, the financial benefit depends on the property’s condition and the complete cost of construction. Site preparation, utility connections, permits, and other expenses must be considered before deciding whether building is the right option.
Step-by-Step Guide to Building on Your Own Lot
Building a home involves several connected stages. Following a clear process can help you make informed decisions and reduce avoidable problems.
Step 1: Evaluate Your Lot Before Starting Construction
The first step is determining whether your property can accommodate the home you want to build.
Begin by reviewing the lot’s dimensions, boundaries, access, and existing conditions.
Check property boundaries. A current property survey can help identify the lot’s boundaries, easements, and other restrictions that may affect construction.
Review zoning and setbacks. Confirm the property’s permitted use and the required distances between the home and property lines.
Evaluate soil conditions. Soil testing and professional engineering can help determine suitable foundation requirements.
Inspect drainage and slope. Identify areas where water collects, flows across the property, or could affect the proposed building location.
Check road access. Make sure the property has suitable access for construction equipment, deliveries, and the future driveway.
Confirm utility availability. Determine whether water, sewer, electricity, natural gas, and internet services are available at the property.
These checks are especially important for undeveloped lots and rural properties around Waco.
A property that looks ready for construction may require grading, utility extensions, drainage improvements, or other work before building can begin.
Step 2: Understand Local Building Permits and Regulations
Before construction begins, you must understand the requirements that apply to your property.
Within Waco city limits, residential construction generally requires applicable permits, plan reviews, and inspections. Properties outside city limits may fall under different local jurisdictions and requirements.
The City of Waco provides official information about residential construction permits, plan submissions, and inspections.
Depending on your project, the approval process may involve construction drawings, site plans, foundation details, and other supporting documents. Additional requirements may apply if the property is in a floodplain or has other site-specific restrictions.
Do not begin construction until the necessary approvals have been obtained. Your builder should help coordinate the documentation and communicate with the relevant authorities.
Step 3: Establish a Realistic Budget
A successful custom home project begins with a clear understanding of your finances.
Your budget should cover the entire project rather than construction alone.
Important expenses may include:
- Architectural design and engineering
- Property surveys and soil testing
- Land clearing and site preparation
- Foundation construction
- Framing, roofing, and exterior finishes
- Plumbing, electrical, and HVAC systems
- Insulation, drywall, flooring, and cabinetry
- Kitchen and bathroom fixtures
- Utility connections and extensions
- Permits and required inspections
- Driveways, landscaping, and outdoor features
If you already own the land, you may avoid purchasing another property. However, site preparation and infrastructure costs can still affect your overall budget.
Request a detailed written estimate from your custom home builder. Make sure it explains included work, allowances, exclusions, payment milestones, and how additional expenses will be handled.
It is also wise to maintain a contingency reserve for unexpected costs. The amount should reflect the property’s condition, the complexity of the design, and the risks identified during planning.
Step 4: Choose a Floor Plan That Fits Your Land
Once you understand your property’s limitations and budget, you can begin planning your home.
The floor plan should reflect your lifestyle while making efficient use of the available space.
For example, a family that frequently entertains guests may prefer an open kitchen and living area. Someone who works remotely may prioritize a quiet home office. Families planning for the future may need additional bedrooms or flexible living spaces.
Your design should also consider the lot’s dimensions, required setbacks, driveway access, sunlight, privacy, and outdoor space.
Popular features for custom homes in Central Texas include covered patios, functional kitchens, spacious living areas, and energy-conscious building materials.
However, a larger house is not always the best solution. A thoughtful floor plan can improve comfort and functionality without unnecessarily increasing construction expenses.
Work with your builder and design professional to develop plans that meet your needs and comply with applicable regulations.
Step 5: Select the Right Custom Home Builder in Waco, TX


Choosing a reliable builder is one of the most important decisions you will make.
Look for a professional who understands local construction requirements and has experience building homes on individually owned lots.
Before hiring a builder, ask these questions:
- Have you completed projects on owner-owned land?
- Can I review examples of your previous homes?
- Can you provide recent client references?
- What does your construction estimate include?
- How do you evaluate site conditions and foundation requirements?
- Who coordinates subcontractors and inspections?
- How are changes to the original plans priced?
- What is your process for handling delays?
- What warranties and post-construction support do you provide?
Review the written agreement carefully before signing.
The contract should clearly explain the scope of work, project responsibilities, payment schedule, allowances, exclusions, change orders, and warranty terms.
Compare builders based on experience, communication, workmanship, and the clarity of their proposals—not simply the lowest price.
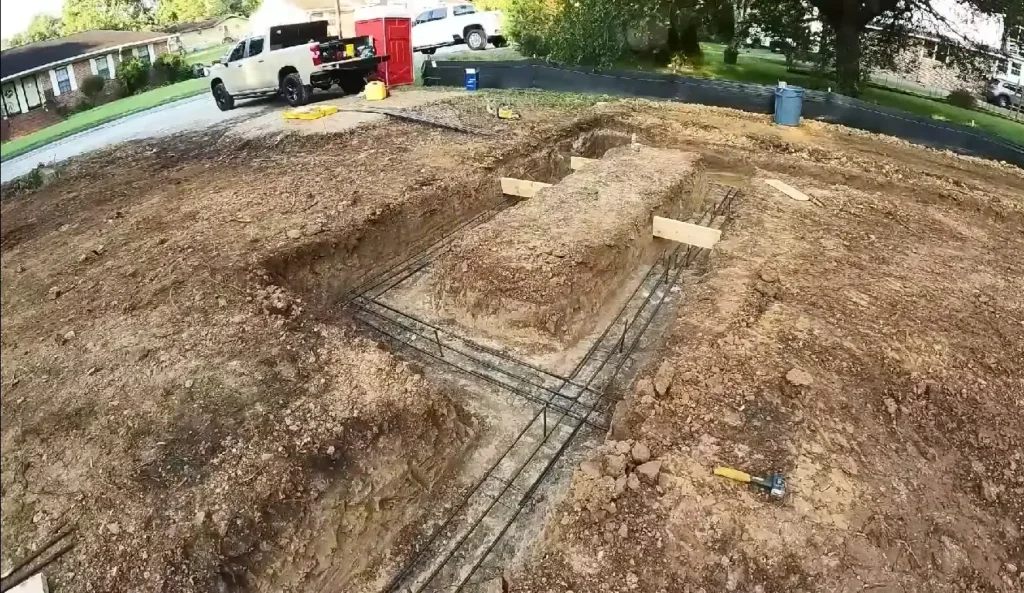
Step 6: Prepare the Land for Construction
After the necessary planning and approvals, the property may need preparation before foundation work begins.
Depending on its condition, site preparation may involve:
- Removing unwanted vegetation and debris
- Clearing trees where permitted
- Grading the building area
- Managing surface water and drainage
- Preparing construction access
- Excavating for the foundation
- Coordinating utility connections
The amount of work required depends on the property’s terrain, existing infrastructure, and proposed home design.
A developed neighborhood lot may need relatively little preparation. An undeveloped rural property could require considerably more work, particularly if utility connections are not available nearby.
Ask your builder to identify known site preparation requirements and explain any costs that remain uncertain.
Step 7: Coordinate Utility Connections
Your home will need reliable access to essential services.
Depending on the property, these may include electricity, water, wastewater services, natural gas, and internet connectivity.
If municipal water and sewer services are unavailable, you may need to investigate alternatives such as a private well or an approved septic system. These options require appropriate professional evaluation and applicable approvals.
Do not assume that utilities are available simply because neighboring properties have them. Confirm connection locations, service capacity, installation requirements, and costs before finalizing your budget.
Coordinating utilities early can help prevent avoidable delays once construction is underway.
Step 8: Begin Construction and Schedule Inspections
Once the plans and necessary approvals are in place, construction can move forward.
Although every project is different, a typical custom home follows several main stages.
Foundation: The foundation is constructed according to the approved plans and engineering requirements.
Framing: The walls, floors, roof structure, and other structural components take shape.
Plumbing and electrical work: Essential systems are installed, along with heating and cooling components.
Insulation and drywall: Insulation is installed, required checks are completed, and interior wall surfaces are finished.
Interior and exterior finishes: Flooring, cabinets, countertops, fixtures, paint, and exterior details are completed.
Final inspections: Required inspections and approvals are completed before occupancy, as applicable.
The exact sequence depends on the home’s design, weather, material availability, and local requirements.
Your builder should provide regular updates and explain how changes or unexpected issues may affect the schedule.
Step 9: Complete the Final Walkthrough
Before accepting your new home, conduct a detailed walkthrough with your builder.
Test doors, windows, faucets, toilets, electrical outlets, lighting, and heating and cooling systems. Review visible finishes, cabinetry, flooring, and exterior work.
Make a written list of incomplete items or defects that require attention.
You should also receive ap